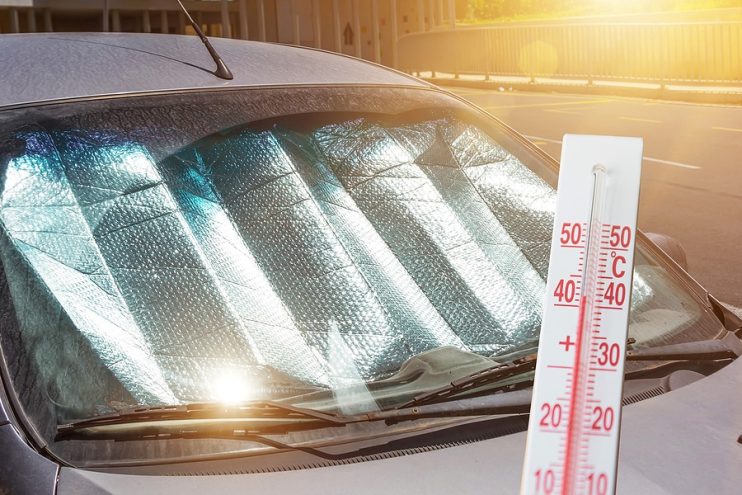
How Far Can You Drive on a Flat Tire

Have you ever encountered a case of a punctured tire and there is no place around to pull over and change the tire? How far can you drive on a flat tire? Fortunately, you can still drive a short distance before you cannot go any further.

Although driving with a flat tire is dangerous because it can cause damage to the wheel, there are still cases of force majeure. According to experienced car drivers, it is vital to go slowly, try to drive on flat roads, and come to a complete stop somewhere safe as soon as possible.

How Far Can You Drive on a Flat Tire

Never try to go more than a few miles with a puncture, even if the tire is not completely flat. You may need to go further than that to get to the tire changer. But at least, you can stay away from the dangers of the big road. Remember to slow down and pull over to a safe place as soon as possible.

  • You can change your tires almost anywhere. So, do not find a private parking spot for your car.
  • Make sure your safety before worrying about car repair.

Driving a Car with a Flat Tire

1. Drive slowly

Do not try to go faster than 15 mph to 20 mph with flat tires. Going fast can cause permanent damage to the wheels and can cause you to lose control of the wheel. Gently press the accelerator pedal and go slowly until you find a suitable place to change the tire.

  • Driving at high speeds will only damage the wheels faster because high speeds can expose the wheels to greater forces without the tires protecting them from rough patches or road debris.
  • If you are going downhill, let the vehicle go down gently by inertia with one foot ready to brake.\

    2. Choose the terrain when driving with flat tires

    Stay away from potholes, slippery slopes, or rough, cracked roads. Bad pavement can damage the rims, bending and deflecting the rims. Pay attention to wet or sandy terrain that can cause the vehicle to slip, sink or get stuck. Asphalt roads, parking lots, or highways are the best terrain options for cars with a flat tire.

    3. Going straight is best

    Do not take zigzag or winding roads when looking for a place to change tires. Instead, go slow, straight, and turn gently. Remember to find the straightest path to take.

    • Keeping the wheels running can help combat wheel traction. But do not push too hard if it could interfere with your ability to drive.
    • Fast and sharp turns can put pressure on the rims.

      4. Quickly to a safe place

      When you have the opportunity, get off the main road and head to a place with less traffic. Make sure the vehicle comes to a complete stop. Then, pull the handbrake and turn on the emergency lights to alert other drivers that your vehicle is in trouble.

      • Park the vehicle on a level surface in case that your vehicle will need to use a lift rack.
      • Do not get out of your vehicle if you are unsure of the traffic conditions on the road.

Tips for Driving on the Highway for the First Time

Driving on the highway for the first time can be nerve racking, which is why it’s common for new drivers to only navigate local roads until they gain enough real-world experience to venture onto the interstate. Once a new driver is ready to take on a highway, being fully prepared can help a beginner make a smooth and safe transition from local roads to the interstate.

Here are some highway driving tips that new drivers should consider before driving on the highway for the first time.

1. Pick the right time to start driving on the highway

If you’re planning your first highway drive, you want to pick the right time and place. Consider starting off on a highway that isn’t too busy, or during a time of day when less drivers are on the road. You also want to drive on a bright, clear day without any rain, snow or fog that could decrease visibility.

2. Start off driving in the right lane

When you’re driving on the highway for the first time, you should only drive in the right lane. Young drivers really have no business heading into the left lane, which is intended for passing. “Staying in the right lane will help them interact with traffic coming onto the freeway, and they’ll maintain their speed easier there,” says Maria A. Wojtczak, who owns and operates DrivingMBA, a driver’s-ed business in Arizona.

3. Leave enough space to change lanes

Establishing proper speed and distance remains key to managing a lane change on an interstate. Drivers should leave four to six seconds-worth of space between their car and the vehicle in front of them as they maneuver. You should also routinely check the rear-view, side-view mirror and blind spot before switching over. More space means you have more time to avoid a collision or react to debris on the highway.

4. Use turn signals when merging and changing lanes

Young drivers must get in the habit of using their blinkers constantly, even if they believe their intentions are obvious. “Blinkers are the only way we have to communicate with other drivers,” says Chris Duquin, owner of Stevens Driving School, which has several locations in the state of New York. “It’s amazing how often drivers cause problems by not using them on highways.”

5. Keep a wide viewpoint

Newer drivers tend to stare at what’s right in front of them. But highway speeds and unpredictability demand a wider viewpoint. “They need to look closely in front of their vehicle, but also farther down the road and into the rear-view,” Duquin says. “Good drivers continuously adjust their observation points.”

6. Keep your cool while driving

Learning to drive on the highway is about more than proper driving—it’s also about making sure a young driver’s maturity level is up to the task. “They must understand never to take anything personally, especially on a highway,” says Michael Soubirous, a retired California Highway Patrol lieutenant who now writes a local newspaper column in Riverside, Calif., called “On the Road.” “If someone cuts you off, let it go. You never know the mental state of the other party and maybe they simply made a mistake. Drivers are not perfect, after all.”

7. Stay focused on the road

According to the CDC, drivers under the age of 20 have the highest proportion of distraction-related fatal crashes. That’s why it’s crucial to stay focused on the highway. Don’t text on your phone, try to change music or be distracted by talking to friends while driving on the highway.

What to do if your accelerator sticks

It doesn’t happen often, but when a gas pedal sticks or malfunctions, the situation is frightening and extremely dangerous. In an instant, the vehicle can accelerate to full speed and become unresponsive to braking efforts.

Mechanical malfunctions — such as a faulty throttle, external interferences, a floor mat that wedges under the pedal — can contribute to this type of unintended acceleration.

What to do if your accelerator sticks

Below are some ways that may correct the stuck accelerator and help you to remain safe.

  1. Stay calm and try not to panic.
  2. Push the brake firmly with both feet and hold it down. Don’t pump the brake pedal or release it because you will lose all your vacuum power assist, causing your brakes to become stiff and very hard.
  3. Shift the car into neutral. If the car has a manual transmission, remember to depress the clutch to shift gears.
  4. Steadily hold the brake and look for an escape route, like a hard shoulder on the highway. Avoid quick lane changes, which could cause you to swerve and lose control of the vehicle. If possible, steer in a straight line.
  5. Do not turn off the engine unless shifting into neutral is unsuccessful. Turning off the engine will turn off the power-assist brake functions, making it harder to maneuver the car.
  6. When you have come to a controlled stop out of the way of traffic, turn the engine off (if you have not already done so). If you use a key, keep it in the ignition when you turn off the engine so the steering wheel doesn’t lock.
  7. If your vehicle has a start on/off button, hold the button down for at least three seconds to disable the vehicle. Do not tap repeatedly.
  8. Call for assistance. Do not drive the vehicle until it has been professionally serviced.

Common Car Dashboard Symbols

Today’s cars have many different dashboard lights designed to alert drivers to possible problems and to make sure you can take care of those problems quickly.

Here’s a quick guide to common car dashboard icons and what they mean.

1. Check engine light

In newer cars, the lit icon will look like an engine. It means the vehicle’s computer has triggered a diagnostic trouble code indicating there’s an issue. If it occasionally turns on and off, it’s an intermittent problem and you’ll just want to have it checked next time you take it in for maintenance.

However, if it stays on, it means there’s an ongoing problem – though it could be as simple as the gas cap not being closed tightly. If the problem continues, get the engine checked out. If the light flashes rapidly, the problem may be serious and you should get to a repair shop immediately.

2. Tire pressure warning light

This dashboard light looks like a tire with an exclamation point in it and means that the tire pressure in at least one of your tires is low and underinflated. You’ll want to check your tire’s air pressure immediately. You still should check your tire pressure once a month.

3. TPMS light

This dashboard light stands for Tire Pressure Monitoring System and when it comes on, there’s a problem with the monitoring system – probably a failed sensor in one of the wheels. Some people mistakenly believe this means the air pressure is low in the tires, but the TPMS is responsible for keeping track of air pressure in the tires; when it notices a tire is low, it triggers the low tire pressure light. If the TPMS light remains on, have the sensors checked during regular maintenance – and never rely solely on warning signals.

4. Oil pressure warning light

If you see a dashboard light that looks like an oil can, you need to pull over at the nearest gas station. This light signals the loss of oil pressure, and you need to check to make sure you aren’t losing oil.

5. Engine temperature warning light

A warning dashboard light that looks like a thermometer means the engine’s temperature is beyond the normal limits, and it should be checked immediately to keep your car from overheating. You’ll want to check the coolant level and make sure the radiator cap is properly sealed as well as look for coolant leaks. Always allow time for the engine to cool down before checking the coolant level, however, to avoid getting burned.

6. Battery charge warning light

When the dashboard light that looks like a battery comes on, your voltage level is below normal. It means the vehicle’s charging system isn’t functioning properly, so you need to have the battery terminals and alternator checked. If it’s an older battery, you may need to replace it. Learn more about when to change your car battery.

7. Brake system warning light

The dashboard light that looks like a circle inside a set of parenthesis with an exclamation point in the middle represents your brake system – and if it comes on while driving, you need to pay immediate attention to it. It could be triggered by driving with the parking brake on, but it can also mean you’re losing brake fluid.

If it comes on and off intermittently, and you don’t notice a change in braking ability, you should get it to a repair shop as soon as possible. But if it stays on there’s a problem that needs to be taken care of immediately, and you should have it towed to a repair shop.

What to do if you have a tire blowout

If you hear a loud boom coming from your tire while driving, you may have experienced a blowout. A tire blowout will immediately cause your car to begin to slow down as well as pull to the left or right.

This can cause your vehicle to lose control, according to National Highway Traffic Safety Administration (NHTSA).

If you experience a blowout, the following steps  can help you keep control of your vehicle:

  1. First, stay calm.
  2. Don’t step on the brake. This will cause your wheels to lock up and will lead to a total loss of control.
  3. Accelerate slightly and steer as straight as possible.
  4. Begin to slow down by gently removing your foot from the accelerator.
  5. Turn on your emergency lights.
  6. Steer towards the right-hand lane and pull over when it’s safe.
  7. Change the tire If you know how to and have room to do so safely. Call a towing company if you have any doubts.


Electric Car Charging Safety Tips

You can easily plug in your electric car, walk away, and let the battery recharge — much like your mobile phone. However, an electric vehicle’s (EV) battery is bigger and more powerful than the device you carry in your pocket or purse, and its charging cord carries far more electricity. While EV charging is safe when using the right equipment, you must follow some steps to help ensure the car’s battery health and your own well-being.

Safe Charging at Home
Home charging is the easiest and most practical way to recharge your electric car. If charging at home is an option, you can choose from two types of charging.

Level 1
Level 1 is the slowest method for charging an EV. However, using this trickle charging is easy and requires no special installation. A Level 1 charger comes with many electric vehicles and plug-in hybrids (PHEVs) to connect to a standard 120-volt AC outlet, which many garages have. Aftermarket Level 1 charging cables are available for purchase.

Select charging equipment that is certified to meet safety standards.
Plug Level 1 charging cords directly into an outlet that can handle the amperage.
Never use an extension cord or multiplug adapter for EV charging.
Charging cables are a tripping hazard, so be aware of the cable’s location.

Level 2
Using a Level 2 charging station at home allows many EV and PHEV owners to plug in overnight and replenish the mileage range used in their daily commute.

Level 2 chargers require a dedicated 240-volt circuit to avoid overload.
Qualified electricians must install the equipment.
Maintain the charging station’s parts and replace damaged or worn components that can malfunction.
Cover outdoor charging equipment to prevent water damage.
Pro tip: It is generally safe to charge an electric car when raining. However, the owner’s manual has the manufacturer’s specific guidance for charging in wet conditions.

Public Charging
Electric car drivers can utilize more than 50,000 public charging stations nationwide when away from home. Constant exposure to the elements and having many users make these chargers susceptible to excessive wear. A damaged charger is an unsafe charger, one that could cause harm to you or your EV when plugging it in.

Before plugging in your car, inspect the charger for apparent signs of damage.
Ensure the plug fastens snugly into the car’s charging port, as broken clips may prevent a secure and unsafe connection.
Level 3 DC Fast Chargers account for about 6,800 of the country’s public chargers. They are safe to use, but for EV battery health, it’s best to limit taking advantage of these high-voltage chargers that charge a battery rapidly. While convenient for out-of-town road trips, DC Fast Charging strains the battery, and frequent use can negatively affect performance and durability.

Pro tip: Keeping your battery’s state of charge between 20% and 80% will maximize its useful life. There are exceptions to this widely accepted rule of thumb, and your owner’s manual will say what’s best for your EV.